If your kitchen isn’t looking its best, you may be considering some major revamping—but you’re probably not too excited about the price tag. New appliances, lighting, or countertops are sure to make a bang, but they don’t come cheap. A much more affordable way to get major impact without breaking the bank is painting your cabinets. Whether your faded, stained cabinets just need a fresh coat or you want to update from rustic wood to a more modern look, painting your cabinets will drastically improve the look of your kitchen.
While it’s less expensive than other major projects, it’s not as simple as slapping on your favorite color. Painting cabinets requires very specific and thorough preparation. Unlike walls, cabinets and drawers are actively handled everyday, so it’s important you know what you’re doing in order to get results that last.
It’s probably worth it to at least get an estimate, but if you’re up for getting your hands dirty over a long weekend, here are the steps to follow for a job well done.

HOW TO PAINT YOUR CABINETS
1. Protect your kitchen. Cover your counters and appliances with butcher or rosin paper and painters tape.
2. Empty the cabinets. Painting your cabinets will take a couple days, so you may want to set up a makeshift kitchen in another part of the house, or just make sure plates, glasses, etc. are neatly stacked out of the way.

3. Clean your surfaces. Grease will ruin your hard work, so use TSP to clean the surfaces you’re planning to paint.
4. Fill any dings, scratches, or open grain with wood filler, so your surfaces are nice and smooth.
5. Keep track of where things go. You’re going to be disassembling your cabinets, so come up with a way to keep track of where each door goes. Use painters tape to label cabinet doors and their respective spots, so you aren’t left with a beautifully painted but very frustrating puzzle.
6. Take off your cabinet doors and remove hardware. Make sure you don’t lose any hardware or screws—do yourself a favor by keeping these pieces together and organized.

7. Sand. If your cabinet paint is in extra rough condition, you may need to strip it. This will add another day to your project, so be sure to plan ahead. In most cases, though, you won’t need to strip the paint—just give it a good, even sanding using medium-grit sandpaper. If your cabinets are laminate, be sure to avoid over-sanding them—you don’t want to damage the laminate. The goal is just to rough up the surface enough to bond to the primer.
8. Clean up the dust. Dust is an enemy to painting projects, so be thorough—use a vacuum for the major mess, and then give everything a good wipe-down with tack cloth.
9. Set up your painting space. You’ll need a space to put your cabinet doors while you paint them. There are a few ways to do this, depending on what tools you have available, and how you plan on painting them. You’ll need a structure to put your cabinet doors on that allows you to paint them evenly and allows them to dry. You can buy a painter’s pyramid or painter’s tripod, or build your own. If you’re planning on using a sprayer, you’ll want to set up your painting space in an easily ventilated area, like a garage.
10. Prime. Now that your painting station is set up, it’s time to prime. Most regular primers are made for drywall, and don’t have the durability that cabinets need. Get a multi-surface bonding primer, and use a brush to apply a thin, even coat.

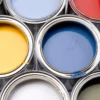
11. Finally, it’s time to paint! Just like with primer, regular interior paint isn’t up for the task of enduring the wear and tear cabinets get. Select a paint that’s specifically formulated for cabinets, so your work stays looking fresh for years to come. For a truly professional-looking finish on your cabinet doors, it’s recommended you use a High Volume Low Pressure (HVLP) sprayer. If you use a roller and brush instead, follow the wood grain. Don’t over-apply—two thin coats should be plenty. Depending on the limitations of your work station, you’ll probably need to paint the backs of cabinet doors first, let them dry, and then paint the fronts. Make sure you take this into account and give yourself the time you’ll need to complete this project.
12. Reassemble. Once the paint dries, it’s time to reassemble your kitchen! Before you put your hardware back, you may want to clean it off using dish soap and warm water.
13. Clean up, and enjoy your new cabinets! Make sure to wipe them down periodically to help prevent staining over time.

Painting your cabinets is a big project, but it’s sure to drastically improve the look and feel of your kitchen. If you don’t have the time, space, or energy to take it on, call for an estimate—you may be surprised at how affordable a professional cabinet paint job is.